


The best way to take pictures for your business application using Canvas app
Many businesses have made it their 2019 resolution to create their own business applications using Canvas app. Following our last article on this topic, one of our readers has asked us how to enable users to take pictures in an application created by Canvas App.What makes this question interesting, is the fact that this Microsoft PowerApps provides two ways that allow the users to take pictures. Both of these methods have their advantages and disadvantages. Combining the best of these two worlds, is a sure way of optimizing your application. This article will explain how to combine the two methods in order to optimize picture taking on your business application using Canvas app in PowerApps:
Two options
There are two roads you can follow when wanting to integrate images from your mobile phone into your Canvas app:
- One control activates the phone camera, once the authorization has been activated and the picture has been taken after a click (On Select event)
- A feature that allows you to download an image either from the gallery or from the phone camera (the phone camera itself, contrary to the first option, it is not integrated)
1. The simplest option: The camera control
The Camera control allows you to integrate your phone camera directly into Canvas app.
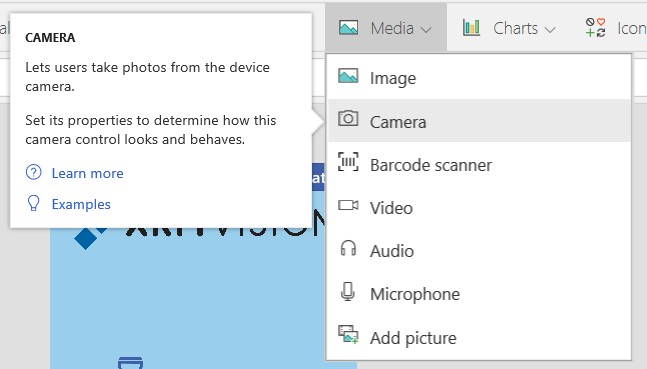

Advantages
- Direct integration, no other step is required to access the camera

Disadvantages
- Unlike the pictures taken on our phones, this method does not have a freeze frame which allows us to view the picture we just took.
2. The most complete option: The Add Picture control:
The Add Picture control offers two options to include an image:
- Upload an image from your phone gallery
- Upload a photo you just took from the phone camera instead of the one that is in the Canvas app
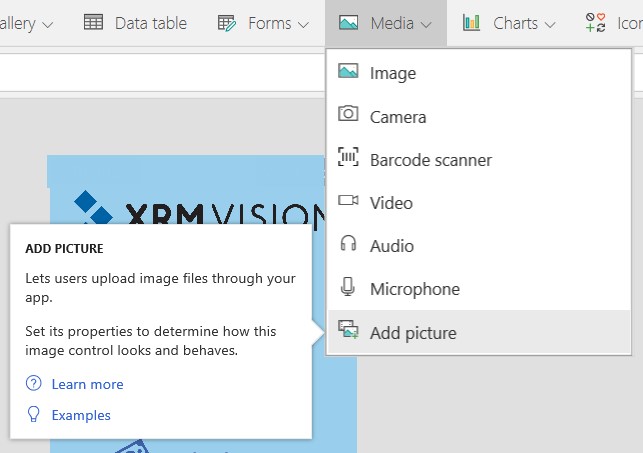
Advantages
- Downloading an image that has already been taken by the user
- Usage of the original functions of the camera
- Instant view of the photo taken
- Integrated preview of the photo once uploaded
Disadvantages
- Multi-step process
- Some phone configurations do not download images taken directly with the camera
3. Combining both methods to obtain the best results
As it is the case with any other suggested solution, it is always preferable to meet the various requests of the user with as many solutions possible. Neither option is perfect, this is why combining the two will result in the best value for money solution.
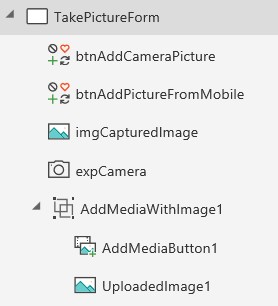
Here is an example of how to integrate them into a single format:
- Add Picture Control ➤ to attach the image from the camera of your mobile device.
- Camera control ➤ to activate the camera integrated in the application
- Image Control ➤ to display the photos taken
- Two icons ➤ to select the Camera or Picture command
OK… any details?
1. Add Picture Control ➤ to attach the image that is on your cell phone—AddMediaWithImage1
- Setting the visibility according to specific variables, ensures that the display only takes place when the user chooses to download an image from his mobile using the attributed icon.

- When the user clicks on the image, place it in variable (TakenPic) and hide this control

- Display the selected file or the previously taken image, by assigning the TakenPic option to the Image control of the Add Picture—UploadedImage1

2. Camera Control ➤ to activate the integrated expCamera
- Set the visibility level according to a local variable. The display will only take place when the user uses the integrated camera using the attributed icon

- When the user clicks on the image, place it in variable (Takenpic) and hide this control

3. Image Control ➤ to display the photos that have been taken—imgCapturedImage
- Define as visible when the other two controls are not visible

- Adjust to the image that the camera control or image control has processed.

4. Two icons➤ to select Camera or Add Picture control
- First, to use the Camera control, set the takePic variable to true—btnAddCameraPicture

- Then, to use the Picture control, set the variable takeFile to true-btnAddCameraPicture

There you go! With this combined approach, users can easily take pictures using your business application. The user experience of your application will be greatly improved, as will the user adoption rate! But we have not seen everything. Several other tips will help you optimize the photo capture in your Microsoft PowerApps Canvas app. For example, do you know how to allow your users to attach an image to a gallery? Or how to allow them to update a series of images by modifying, adding or deleting items from the collection? We will cover this in a future article! Interested in learning more about this application? Ask your questions to our experts, who will be able to offer you personalized advice! Stay tuned for the latest news, follow us on LinkedIn or Twitter! This article was made possible due to the expertise of our CRM architect Éric Sauvé.


.png)
.png)


